

First use
We have created a small quick start guide (PDF) for you to get started: https://ictrainer.de/wp-content/uploads/2022/03/Quickstart-Guide_en.pdf
We made a very conscious decision that you need to download all the files necessary for the workout before you start your session, and then you can start it.
Of course, you can freely choose between the pure workout with a few kilobytes of data and video rides of several hours with music with up to a gigabyte of data.
The download only takes place the first time you use it and is always available afterwards – even if you train completely offline in the garden, garage or basement.
The reason for this is that nothing is worse for us than having your training disrupted in the middle of it by technical problems.
After all, we have no control over your Internet connection (and sometimes several people use it at the same time).
In addition, your hardware requirements are lower and you can, for example, perform your workout on a 10-year-old Windows tablet without problems and stream Netflix&Co in parallel.
Of course, a reliable worldwide server structure would also incur significant costs, which would have a negative impact on the price of icTrainer.
Pro-Tip: By the way, you can also download all videos at once with the code “video” (music code “music”), so that later you only download the units themselves (which are super small).
For Windows and MacOS, you also have the chance to transfer this data very easily to a USB stick.
You also have the chance to do all workouts as pure workouts without music and video, which you can download and store super quickly.
First of all, you should select your training platform in the USER PROFILE of our software. It is important for some platforms that you use the same email address in our software and in the training platform. 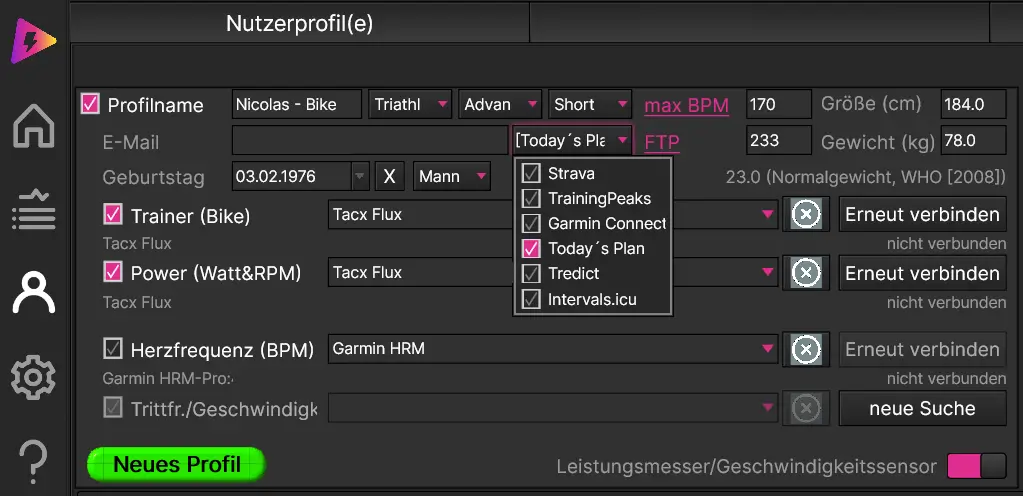
After you have uploaded a workout to a training platform for the first time (and logged in there once in this context), all subsequent workouts of the day will be displayed directly on the icTrainer start page – for example:
After finishing your workout, we will ask you if you want to SAVE the RESULT and if you want the data to be uploaded to your preferred training platform.
For most training platforms we offer an automatic upload. You can also watch our explanatory videos on YouTube.
Of course, you can also upload old workouts manually to a platform. Simply click on the corresponding button on the training results page and download the .tcx file or upload it to Garmin:![]()
A very important point for us is that you can also use all other icTrainer functions during training. For example, it is also possible to adjust, rewind, add music and much more to an ongoing training session in the editor. This is the same as outside, where you can also decide at short notice to lengthen or shorten the unit or to ride one more climb (and thus one more load interval). However, this is only possible with an interface (UI-UserInterface), which may initially appear a bit overloaded. But you quickly get used to it and soon appreciate this “feature”.
Unfortunately, some smart trainers cannot reduce the resistance enough at low wattage settings and high cadence depending on the selected gear ratio. Sometimes it helps to choose the easiest gear on the bike.
Example: https://support.garmin.com/de-AT/?faq=4PAzxvbvOL6AliMxKaShQ9
Of course!
In “Structured workouts” you can deactivate ERG mode via a small switch (=SIM mode).
You can find this switch under the left-hand speedometer by clicking on the button with the three dots.
With “Real routes / GPX”, the ERG mode is deactivated by default and you determine the resistance via your gear shift – just like in real life.
If you want to create “New workouts”, you can specify in each interval whether you want to base the resistance on your FTP, i.e. ERG mode, or an incline, i.e. SIM mode. It is also possible to use your target heart rate as a guide.
There are even several ways to combine an external power meter + smart trainer + icTrainer. The three most common are as follows:
1. The power match function is available in most smart trainer apps for precisely such cases (aim: an external power meter transmits the watt measurement to the smart trainer via ANT+ and the trainer then transmits it to icTrainer). Such a hardware-side power match is often faster than a software-side power match in a software.
Example Wahoo:https://www.smartbiketrainers.com/how-to-enable-the-wahoo-kickr-snap-powermatch-feature-and-why-you-should-do-it-5726
2. However, you can also add your external power meter in icTrainer under Settings as POWER for power measurement and then only use the roller trainer as TRAINER for power control.
3. Experts simply create two users in icTrainer (one with a smart trainer and one with a power meter) and can then measure both values in parallel. It often turns out that the two devices do not measure so differently. You can then decide which device you trust more…
Some virus scanners always first identify executable files (.exe) as suspicious and then subject the file to a separate check. This only happens to the first user who calls the file and only once. Once this has been done (usually after 90 minutes), the file can then be started normally without the warning.
We try to solve this problem in advance by submitting the file to the virus scanner manufacturers so that the file can be checked. However, we are dependent on your help, i.e. if you have a virus scanner that reports icTrainer as suspicious, please let us know and tell us which virus scanner you are using and we will contact the manufacturer so that this can be checked there in future before we deliver a new version.
The App Store versions of icTrainer naturally do not have this problem, as they are intensively checked in advance by the App Store providers.
Connection problems
Unfortunately, there are many reasons for this:
Several devices are connected to your smart trainer via Bluetooth
If other devices (e.g. watch, speedometer, companion app, etc.) are connected to the smart trainer at the same time, Bluetooth sometimes has problems with the assignment. It is best to simply switch them off for testing.
Your smart trainer or computer does not support Bluetooth
You can usually retrofit your computer very easily and cheaply with a small Bluetooth USB dongel (e.g. https://www. amazon.de/Asus-USB-BT500-Bluetooth-Stick-BLE-Technologie/dp/B08B9WQFTL/ref=sr_1_4)
Your computer supports Bluetooth, but not BluetoothLE
1. Open the device manager (press the “Windows key + R” to open the “Run” window.
2. Then type “devmgmt.msc” into the text field and confirm with “OK”)
3. Open the “Bluetooth” tab.
4. Right-click on the Bluetooth transmitter (often “Generic Bluetooth Radio” or “Intel(R) Wireless Bluetooth(R)”).
Open properties.
5. switch to the “Advanced” tab.
6. Here you will find an LMP number
We need at least LMP6, which corresponds to Bluetooth 4.0…
If none of this helps, you can also send us your log file (click on HELP/? in the navigation on the left and then on Send LOGFILES on the right)….
Please check whether you may have another power control system connected to your smart trainer via ANT+ in parallel (i.e. switched on) (e.g. via bike computer or smartphone). In this case, the smart trainer unfortunately does not know where to get the ERG mode from. Another device (e.g. bike computer) may only be connected in parallel via ANT+ for performance measurement . With Garmin bike computers, for example, it may be displayed in parallel under the sensor type powerbut not as sensor type Indoor Trainer or for the sensor type Indoor Trainer the bike computer must remain switched off during training with icTrainer.
This is necessary so that BluetoothLE can be activated: Two permissions must be granted here: ACCESS_FINE_LOCATION / ACCESS_COARSE_LOCATION. We do not access your location information via the device at any point.
All smartphones, tablets or desktop computers support BluetoothLE out of the box. So you don’t need an exra ANT+ stick for the connection.
You can also send all your training data via ANT+ to your normal fitness tracker (bike computer, fitness watch, etc.) and transfer it to the app of your choice, and we communicate with the bike trainers in parallel via BluetoothLE. We don’t force you into another cosmos.
For Windows and MacOS, you can also connect with an ANT+ heart rate belt or your fitness watch with ANT+, provided you have an ANT+ USB stick installed on your Windows/Mac computer.
If there are problems with ANT+ under Windows 11, there is a good tip here.
You must allow “Access to health data” in your Strava profile.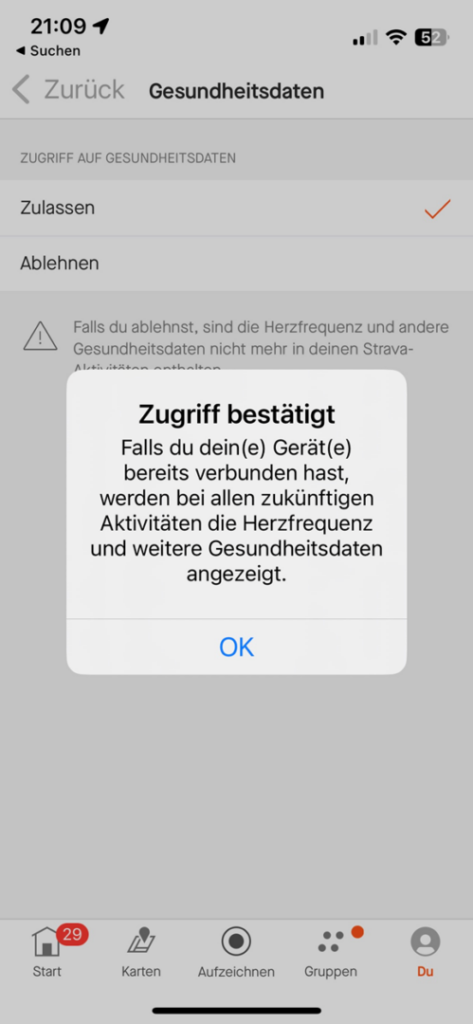
You can use the following free additional app to send the heart rate of your Apple Watch to icTrainer via Bluetooth:
https://apps.apple.com/de/app/heartcast-heart-rate-monitor/id1499771124
Login to Strava in our software only works with email and password / not with Google Login.
You can activate this ADDITIONAL login on Strava as follows: On Strava, go to your SETTINGS -> MY ACCOUNT -> LOGIN DATA (change email address)
First, activate the left buttons on the Zwift Ride and establish the connection to icTrainer.
Once this is done, you can activate the right buttons. This then connects to the left side so that both sides send information to icTrainer.
This is a so-called master-slave concept, according to which, for example, power meters also connect to icTrainer.
Firmware:
Firmware 1.2 or newer is required. This can be checked and updated with the Zwift Companion App on the smartphone.
Tip: If only the right switch works, please “delete” the Zwift Ride completely as a device again (with the X) and when searching again, make sure that at first only the left lights up blue and the right only green.
First, activate the left side of the Zwift Click 2 and establish the connection to icTrainer.
Once this is done, you can activate the right side. This then connects to the left side so that both sides send information to icTrainer.
This is a so-called master-slave concept, which is also used, for example, to connect power meters to icTrainer.
Firmware 1.0 is required. This can be checked with the Zwift Companion App on the smartphone.
Attention: Unfortunately, Zwift has recently prevented the use of the Click 2 with other apps – if it has not been connected to Zwift in the last 24 hours. Then you must proceed as follows:
– If you are already connected to the Zwift Click 2 in icTrainer, click on “Share” in the icTrainer user profile
– Connect Zwift Click 2 under Android/iOS in the Zwift app (no paid Zwift subscription is necessary / the left side of the Click 2 is sufficient)
– Then wait about 90 seconds (the blue light will no longer be on)
– Then close the Zwift app by swiping
– And then click “Connect all” again in icTrainer
License topics
Functions
Yes, we offer many more options for virtual circuits…
Zwift: We support the Play Controller and the Click 1, as well as the Click 2 and the Zwift Ride Bike with restrictions. Note: Information on special features when connecting the Ride and Click 2 can be found in the FAQs under “Connection problems”.
Shimano Di2 buttons: If you have a newer Shimano drivetrain installed, you can also dispense with extra switches altogether and shift gears using the buttons on the brake levers (more information in our YouTube tutorial: https://www.youtube.com/watch?v=zBwzTnwr3So&t=6s )
Software buttons: Here you switch with a button in our software or our remote control app (more information in our YouTube tutorial: https://www.youtube.com/watch?v=BgcPfg5c-qQ )
Alternative shifters: With the B2C Virtual Shifter from Cycplus (our tip: https://www.cycplus.com/products/bc2-shifter ), the MultiRemote from Osynce or the Thinkrider VS200 shifter, you can also use virtual shifting with your smart trainer. And at a significantly lower cost than a Zwift Click, independent of the manufacturer and without complex workarounds.
Of course, ERG mode always works without any problems regardless of this.
Left arrow button up:
SIM mode: heavy gear
ERG mode: +1 watt/percent
Left arrow button down:
SIM mode: lighter gear
ERG mode: -1 watt/percent
Left Arrow button left/right:
Scroll
Left minus:
ERG mode: -1 watt/percent
SIM mode: easy gear
Right Y button up:
SIM mode: heavy gear
ERG mode: +10 watts/percent
Right B button down:
SIM mode: lighter gear
ERG mode: -10 watts/percent
Right Z/A buttons:
Scroll
Right Plus:
ERG mode: +1 watt/percent
SIM mode: heavy gear
Left arrow button up:
SIM mode: heavy gear
ERG mode: +1 watt/percent
Left arrow button down:
SIM mode: lighter gear
ERG mode: -1 watt/percent
Left arrow button left/right:
Scroll
Right Y button up:
SIM mode: heavy gear
ERG mode: +10 watts/percent
Right B button down:
SIM mode: lighter gear
ERG mode: -10 watts/percent
Right Z/A buttons:
Scroll
Left: lower button on the brake lever:
SIM mode: lighter gear
ERG mode: -10 watts/percent
Right: lower button on the brake lever:
SIM mode: heavy gear
ERG mode: +10 watts/percent
Left: two switches at the top/bottom on the side of the brake lever
Up:
SIM mode: heavy gear
ERG mode: +1 watt/percent
Down:
SIM mode: lighter gear
ERG mode: -1 watt/percent
Right: two switches at the top/bottom on the side of the brake lever
Up:
SIM mode: heavy gear
ERG mode: +10 watts/percent
Down:
SIM mode: lighter gear
ERG mode: -10 watts/percent
You can also use the following buttons within a workout:
– Arrows up/down: Adjust resistance (small step)
– Image up/down: Adjust resistance (large step) Note: If these keys do not exist, it is FN + Up/Down
– CTRL + Up/Down: Switch between full screen and non-full screen
– CTRL + Left/Right: Switch tab to left or right
– ESC: Exit full screen display
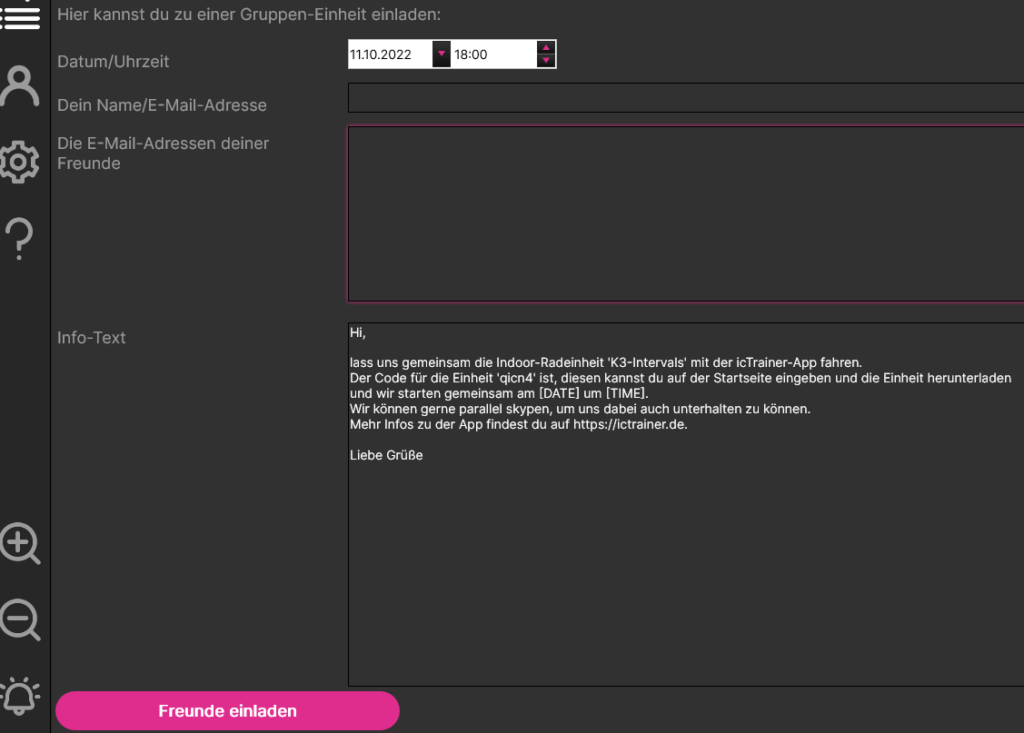
As a club, trainer or friends, you can also hold joint workouts.
To do this, a responsible person downloads the relevant workout in icTrainer in advance and can then invite you to a “GROUP SESSION” in the workout list.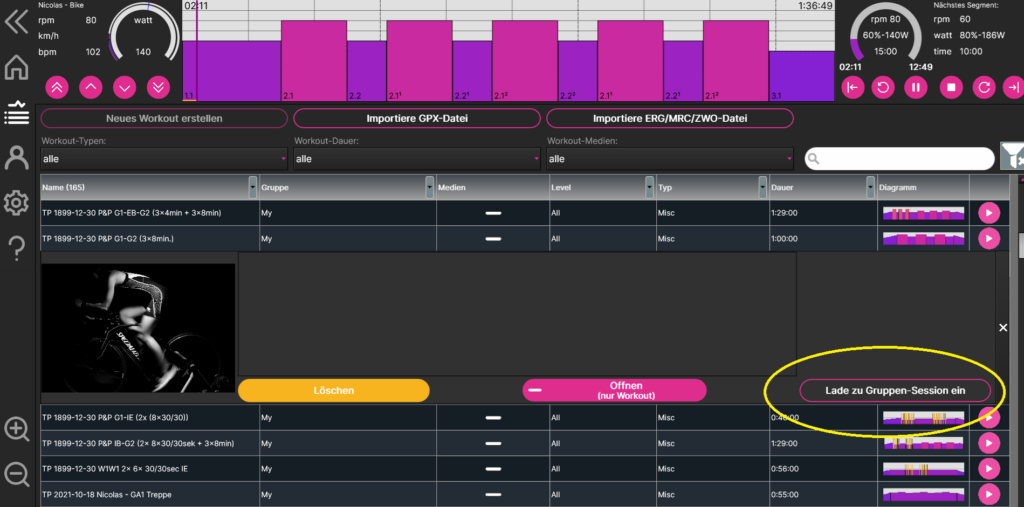
First you need to define your MyMedia directory in SETUP: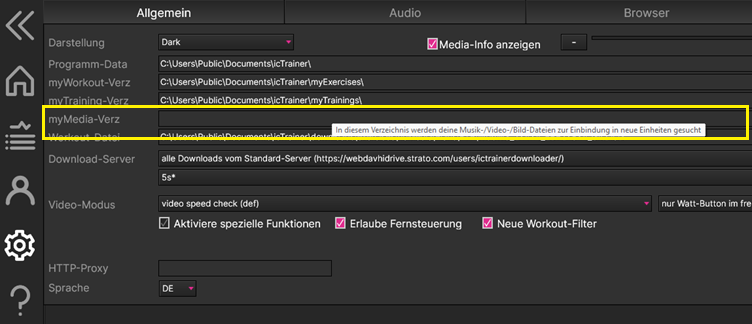
If you then create a “New workout”, you can switch between “Sequence mode” and “Music mode” at the bottom left and see your own music tracks and assign them to the workout by double-clicking.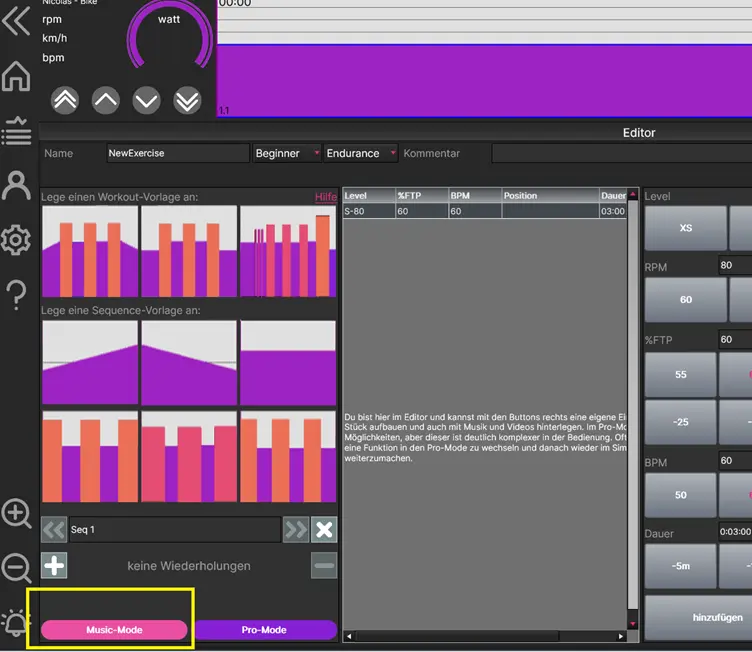
We use Google Maps on Android and iOS, so that a normal map view, a satellite view, a 3D view and even Street View are possible.
We use OpenStreetMap on Windows and macOS – but only with a normal map (as the Google Maps display with additional functions would be subject to a charge).
If you still want to use the Google Maps functions, you must obtain a Google Maps API key privately from Google. This is subject to a fee from a certain number of displays, which you cannot actually achieve as a private individual. You can then enter this in our software under SETUP (left navigation)-> BROWSER (table tab)-> Google Maps Key (line).
If you are driving a route with a dynamic duration, you will see your own position with a blue symbol and the position of the original driver of the recording with a red symbol.
Depending on the operating system, not all video streaming providers are currently supported.
We are working on improving compatibility.
Windows: YouTube, Netflix, AmazonPrime, Spotify, Disney+
MacOS: YouTube, Netflix
iOS: YouTube, Netflix
Android: YouTube, AmazonPrime, Spotify
FireOS: YouTube, Spotify
In the first few minutes of a real route (or on steep climbs) there may unfortunately be minor jerks, as the software first has to synchronize your speed and the speed recorded by us.
However, this should not be permanent.
It can also be helpful to operate the device on the mains connection (as some devices automatically reduce the power in battery mode).
We also switched to improved video quality some time ago and some tablets with older/weaker CPUs can’t handle it as well.
However, you can also deactivate the item “Videos in H.265 (HEVC) quality” in the SETTINGS as a test.
The videos are then (re)downloaded in older h.264 quality.
There are several ways to enlarge the view.
Zoom:
There are two magnifying glass icons in the bottom left-hand corner of the software. You can use these to adjust the font sizes in the program.
Compact view:
If you activate the “Compact view” function in the software in the left-hand menu bar under “SETUP”, you will receive an additional window with the most important training values in large format during training.
This is the best view for smartphones / small displays.
Display:
It is also possible to stream the video to a second display/TV.
Various
Additional Information
You can find more background knowledge in our extensive video tutorials